


DD-WRT
Choisir un Routeur compatible avec les logiciels openwrt :
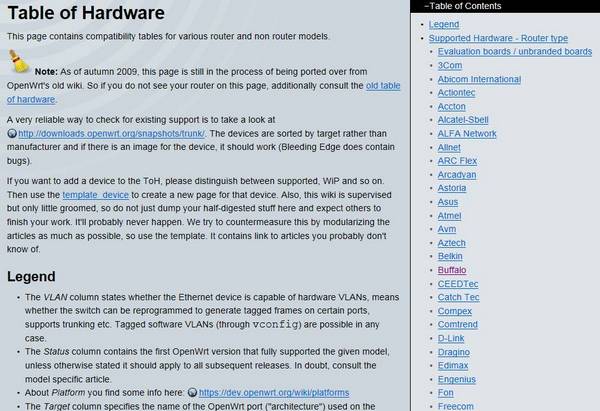
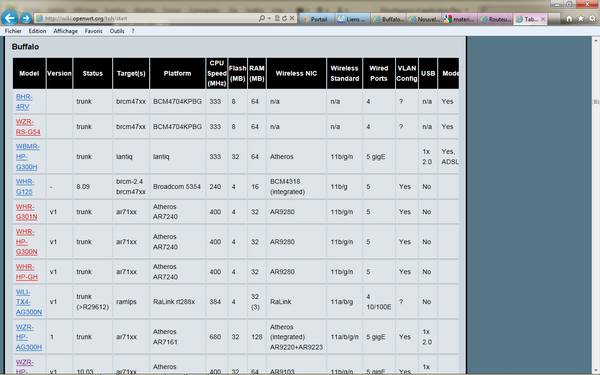
Il y a quelques années nous avons utilisése le WHR-HP-54G fabriqué chez Buffalo et le WL-500G premium de Asus. Les matériels évoluent rapidement aussi il est possible de choisir un matériel compatible ICI
Il est possible pour certains de les alimenter à partir d'un ordinateur portable avec un adaptateur USB-fiche DC (facile à réaliser en récupérant la fiche d'alimentation du routeur et une fiche USB). L'extérieur de la fiche doit être le -, le + est à l'intérieur; le vérifier avant toute connexion. L'intensité absorbée par le routeur est d'environ 600 mA.
Il est aussi possible de l'alimenter à partir du 12 volts du bord avec un simple régulateur de tension 78T05CT (+5 VDC),voir la page concernant les régulateurs de tension.
Téléchargement de la dernière version du Firmware dd-wrt ; il existe une version avec le logiciel AutoAP(scanne en permanence les meilleurs accès déjà installés:
Installation du firmware
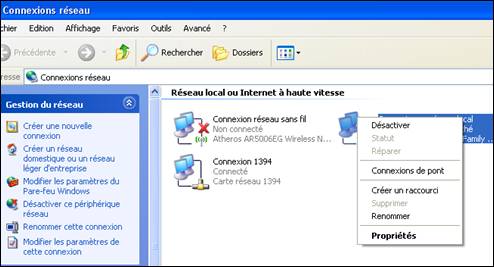
- Éteindre le routeur. L' ordinateur doit être connecté directement (avec un câble droit ou croisé) sur un des ports LAN du routeur.
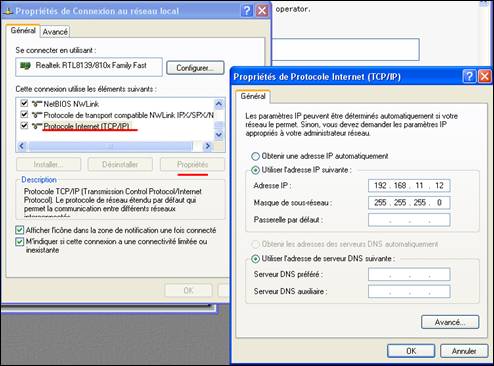
- Modifier l'adresse IP en 192.168.1.2, (ou 192.168.x.2 suivant la notice constructeur) masque de sous réseau en 255.255.255.0, et cliquer sur "OK" -Laisser vierge Passerelle par défaut.
Remarque : si le routeur a pour adresse 192.168.x.1 ou 192.168.x.254 choisir pour l'ordinateur 192.168.x.2 ( 2 peut être remplacé par une valeur comprise entre 2 et 253)
- Faire une copie du Firmware et le renommer par exemple openwrt.trx (un nom court est plus facile à utiliser avec l'invite de commande , voir ci-après); copier ce fichier dans: "\Documents and Settings\votre nom".
- Ouvrir l'invite de commande et taper 'ping 192.168.x.1 -t -w 10'.
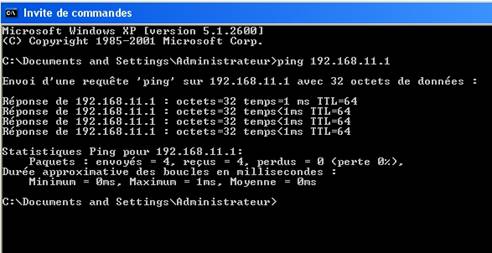
Le routeur est surveillé en permanence par le PC ce qui permettra de démarrer l'envoi du Firmware au bon moment.
- Ouvrir une 2eme fenêtre de l'Invite de commandes , sans presser ENTER ,taper (x devra être remplacé par la bonne valeur)
tftp -i192.168.x.1 PUT ddwrt.bin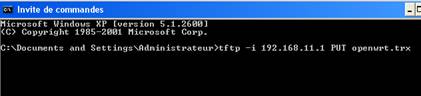
- Mettre le routeur sous tension et surveiller la 1ere fenêtre de l'Invite de Commandes.
- A la première réponse du Ping 192.168.x.1 presser ENTER de la 2eme fenêtre de l'Invite de Commande afin d'envoyer le Firmware au routeur.
- Le transfert est correct le message suivant apparaît :
Transfer successful: 3502080 bytes in 5 seconds, 700416 bytes/s- Rebooter le routeur , il boot maintenant sur DD-WRT.
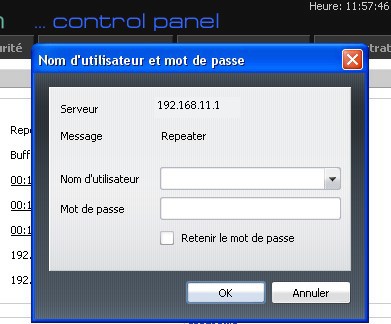
- Entrer le nom d'utilisateur et le mot de passe : root et admin ou admin et admin,suivant le matériel ( voir les spécifications du constructeur), modifiable ensuite comme vous le souhaitez.
Universal Wireless Repeater
From DD-WRT WikiIntroduction
der repeater ist ein ganz normaler client der aber gleichzeitig noch ap sein darf, egal mit welcher ssid oder verschlüsselung. das ist das prinzip Repeater mode is just client mode, while being accesspoint at the same time.
This How-To provides step-by-step instructions for creating a Universal Wireless Repeater appliance: a device that you can place anywhere and it will wirelessly repeat the strongest signal, onto another wireless network (with or without security). This functionality is also known as Wireless Client Bridge, or Range Expander. Unlike WDS, once you have this appliance setup, it will work with any open network.
Architecturally the repeater connects to another wireless router as a client, getting a single IP address via DHCP. Effectively the SSID network it connects to becomes your ISP. Therefore you (the client) will operate in your own IP address space, which is different from address space the repeater connects to.
For example:
In a given neighborhood, there are 3 open access wireless networks, jojo, linksys and internetmad. The repeater automatically receives an IP address from jojo. Let's say jojo is using 192.168.1.0/24, and your DDWRT router receives the address 192.168.1.139. The repeater is configured to use 172.16.100.0/24. From your laptop, you associate with the SSID "repeater" and you receive the address 172.16.101.100 via DHCP. As far as your laptop is concerned you are talking to repeater. As far as repeater is concerned, its gateway is "jojo" and jojo probably has another gateway via cable modem or DSL.
Instructions
1. Install latest DD-WRT v24 release candidate (but not RC6.2! v23 doesn't support repeater modes).
- Visit the UWR forum for test results on firmware versions.
- Keep ethernet cable connected for these instructions (to have connectivity across wireless network changes).
- NOTE WRT54GS v4 and WRT54GL- Will need to be flashed with the MINI GENERIC bin 1st. Otherwise you will brick the router and have to tftp the Linksys bin to recover. Windows, use Internet Explorer as Firefox 2.0.0.4 does not handle the new DD-Wrt v24beta interface well.
2. Go to tab "Setup", sub-tab "Basic Setup":
- Change "local IP address" to a unique subnet (different than device you wish to repeat), such as 192.168.69.1.
- Save settings. (on the new V24 (since 07/04/07)...use the "APPLY" button)

3. Point your browser to the new IP address you chose in the previous step. Go to tab "Security", sub-tab "Firewall":
- Uncheck all check boxes and set firewall to "disable".
- Save settings. (on the new V24 (since 07/04/07)...use the "APPLY" button)

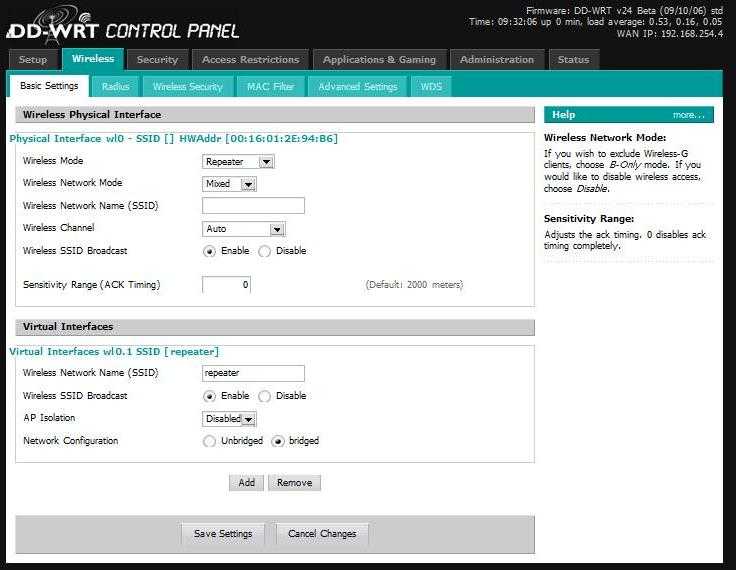
4. Go to tab "Wireless", sub-tab "Basic Settings":
- Set Wireless Mode to "Repeater"
- Under "Wireless Physical Interface", set "Wireless Network Name (SSID)" to the network you wish to repeat. Set Network Configuration to "Bridged".
- Click on "Save Settings" ("Virtual Interfaces" section does not appear until you save the changes)
- Click on "Add" under "Virtual Interfaces", and enter an SSID (such as "repeater"). AP Isolation is "disabled" and Network Configuration is "Bridged".
- Optional: Set Wireless Channel to "Auto" (or your preferred channel).
- Click "Save Settings". (on the new V24 (since 07/04/07)...use the "APPLY" button)
[EDIT-Redhawk]
- If the host AP settings Wireless>>Basic Settings>>Wireless Network Mode is set to "G-only" then your repeater must also be set the same way....otherwise you will not make the connection from the repeater side - 09/22/07
5. To repeat any network dynamically (make this a universal wireless repeater), the following will make the repeater connect to the first available SSID:
- Go to tab "Administration", subtab "Command".
- Copy and paste the following into the edit box:
nvram set wl_ssid=""
- Click the Save Startup button.
Note: this will not automatically repeat secure/encrypted networks. If your source network uses WEP or WPA, enter the ssid under the Physical Interface in step 4 instead, and proceed to the next step.
6. You may use security (WEP, WPA, etc) in repeater mode. An example application of this would be to make the repeated network private (for your use only).
- Go to tab "Wireless", sub-tab "Wireless Security".
- Setup WEP (or other security) under virtual interface.
- Configure your client/computer to use the same security.

Notice in the screenshot above you may also configure security for the physical interface (source) network if you wish to repeat a secure network. In the example this is disabled. If you enable this, the dynamic repeating functionality may not work (since you're hard configuring the source network).
7. The first time you connect to the repeater (wirelessly), or after disconnect, you may need to perform a "repair wireless network connection". For example, in XP, right click on the wireless icon and select "Repair".
Optimizations
8. If you wish to dynamically repeat the STRONGEST signal (a more sophisticated version of #5 above) please read the AutoAP Wiki Article.
AutoAPis a script that continuously scans for open wifi connections, tests them for validity, and connects to the strongest signal. If the connection is lost, the script scans again and finds the strongest valid signal again, and maintains a continuous connection to the internet in a mobile or portable environment. The script paremeters are highly configurable, including ability to configure secure connections.
9. For optional repeater performance enhancements:
-Go to tab "Wireless", subtab "Advanced Settings". Set "Preamble" to "Short". Set "Xmit Power" to higher than default (I use 200). Click "Save Settings". (on the new V24 (since 07/04/07)...use the "APPLY" button)
Also take note of the fact that all repeaters, including this Universal Wireless Repeater mode, will sacrifice half of the bandwidth available from the primary router for clients wirelessly connected to the repeater. This is a result of the repeater taking turns talking to not just one partner, but to two, and having to relay the traffic between them. As long as your bandwidth requirements are within this halved bandwidth amount there will be little or no reduction in "speed".
- peater modes are broken in v24 RC6. Pick another version, such as RC5 or RC7+
- f you are having problems getting repeater mode working, first setup Client Mode or Client-Bridged Mode as a test. Once you have client mode working, then switch to repeater mode (keeping all your other settings) - verify its still working, and then add the virtual interface(s).
- he first time you connect to the repeater (wirelessly), or after disconnect, you may need to perform a "repair wireless network connection". For example, in XP, right click on the wireless icon and select "Repair".
- f your router has two different antenas and you are having high packet loss, it can help to remove the second antena.
- isit the UWR forum for latest information on features and issues.
Exemple avec un routeur Buffalo WHR-HP-54G
Dans un premier temps le routeur peut fonctionner avec son antenne ; pour améliorer la réception il est préférable d'amplifier le signal :
L'adresse du routeur est maintenant 192.168.69.1 (comme dans l'exemple ci dessus ) ,
Aller dans le SHELL et taper : nvram getboardflags
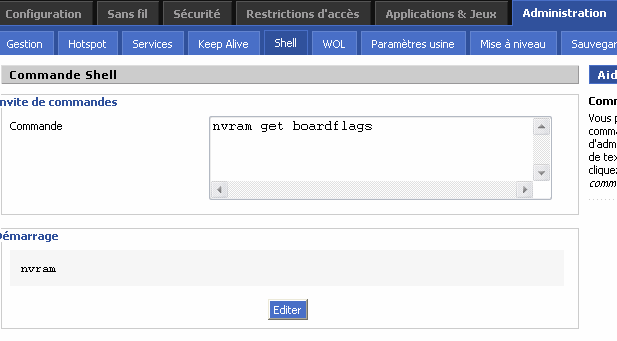
Le résultat sera probablement 0x1758 : réception avec sensibilité accrue
Les autres options possibles sont :
- 0x0758 - Sans amplificateur , réception normale
- 0x2758 - Avec amplificateur, réception normale
- 0x3758 - Avec Ampli et Broadrange( technologie de Broadcomm qui améliore la sensibilité ) pour une sensibilité accrue
Taper : nvram set boardflags=0x3758
nvram commit
Rebooter
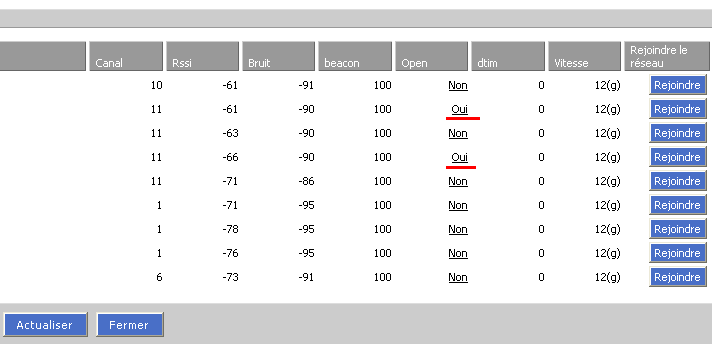
- Choisir un réseau sans fil ---> STATUT/Sans Fil/Réseaux sans fil à portée et choisissez "rejoindre" le réseau ouvert que vous avez choisi
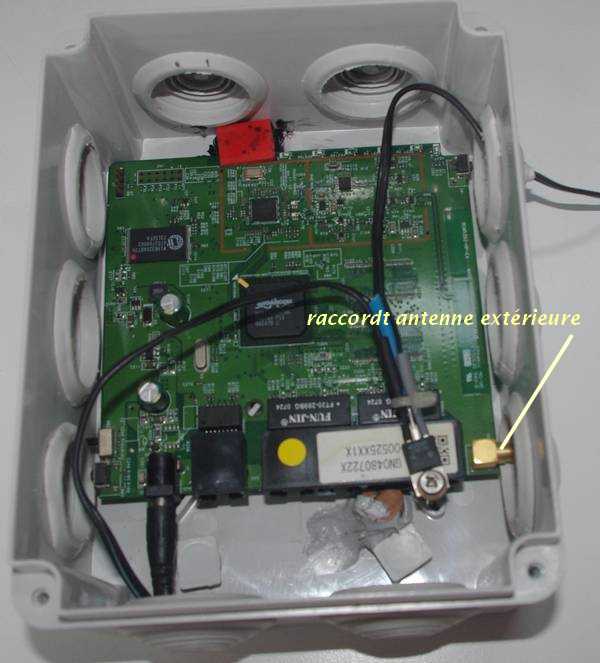
Les antennes internes et externes
Le WHR-HP-G54 dispose de deux antennes , une externe qui peut être remplacé, et une interne sur la carte. Les deux antennes sont utiles, dans les environnements intérieurs (multipath), ou lorsque le Point d'accès ou le client sans fil sont en mouvement. Quand vous utilisez une antenne à gain élevé ou à une antenne directionnelle,il vaut mieux choisir l'utilisation d'une seule antenne , l' extérieure , la droite pour le firmware , pour l'émission et la réception. L'utilisation d' une seule antenne à gain élevé a montré une amélioration de la qualité de la connexion. Cela est vrai en particulier lorsque le WHR-HP-G54 et les clients sont dans des endroits fixes.

Réglage de la puissance
Réglementation :
La puissance maximale autorisée (à l'intérieur et à l'extérieur des bâtiments) ou PIRE (puissance isotrope rayonnée équivalente) est de 100 mW, sauf pour les canaux 10 à 13, où elle est limitée à 10 mW à l'extérieur.
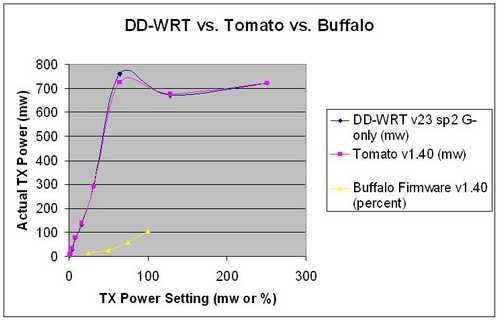
- 12 mW de puissance est équivalent à 100% de la puissance du firmware original Buffalo ,en extrapolant les valeurs ci dessous (indication: tparris).
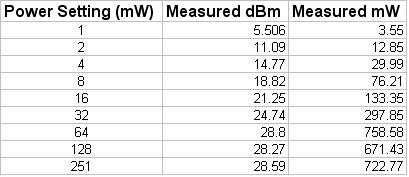
- 28mW (la puissance par défaut) ,(toujours en extrapolant) permet d'établir un équilibre entre l'émission et la réception (puissance de sortie d'environ 200mW) .Cette puissance permet de garantir une bonne sensibilité pour la réception des points d'accès.
Le signal radio doit être en mesure de recevoir aussi bien qu' envoyer. Avec une puissance trop basse les clients peuvent entendre l' AP mais l'AP ne pas les entendre ; avec une puissance trop élevée on augmente la distorsion du signal.
Voici une courbe de puissance indiquant le rapport de la puissance transmise et du réglage de puissance pour différents firmwares dont DD-WRT (mesures effectuées et publiées sur le Net par tparris):
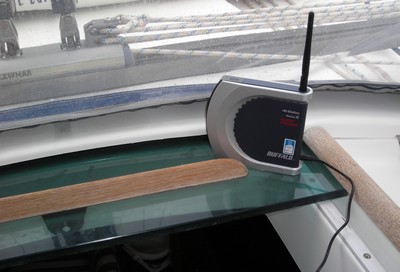
Installation sur le portique du bateau
le routeur est alimenté en 5 Volts ;Il est possible de l'alimenter à partir du 12 volts du bord avec un simple régulateur de tension 78T05CT (+5 VDC),voir la page concernant les régulateurs de tension. .
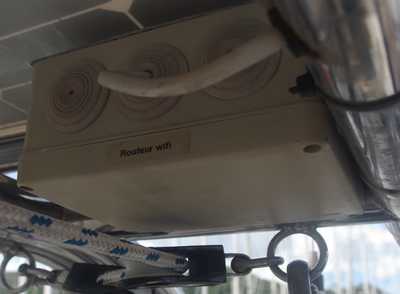
le routeur Buffalo :

 SUN KISS 47 : Pelagos
 BENETEAU 50 : Idem